Creating an AWS Lambda with Cats Effect + Feral and LocalStack
Written by
Jorge Ardilla
Last updated on:
October 1, 2025
Written by
Last updated on:
October 1, 2025
Nowadays, almost every industry uses serverless architectures because of the various cost-effective and flexible solutions they offer. AWS Lambdas are a significant part of this trend, and by now, they have become one of the most famous serverless alternatives—especially when it comes to file processing.
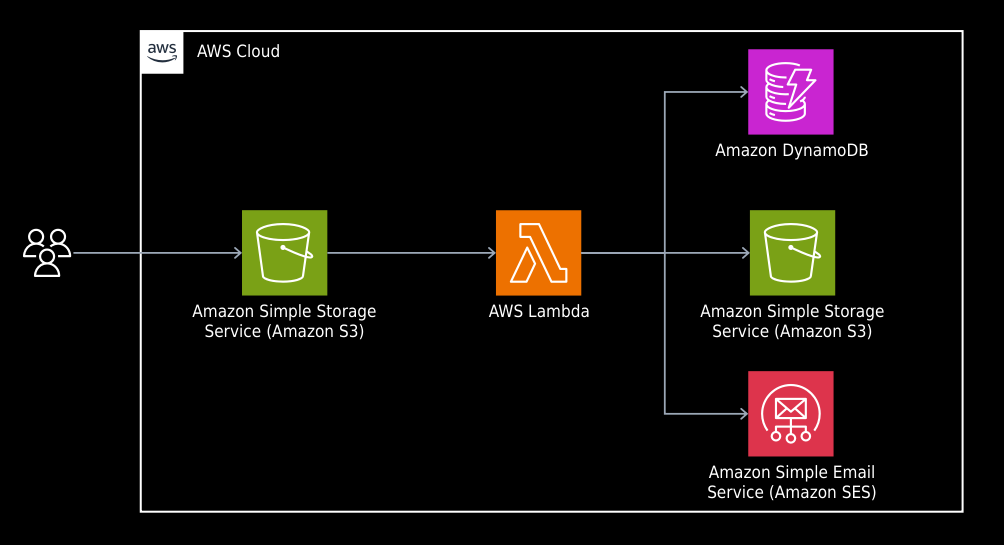
This article will explore a method for creating an AWS Lambda using Cats Effect, which offers several advantages while avoiding extended startup times. Specifically, we will create a profile processor Lambda that will execute whenever a new file is added to an S3 bucket. This file will contain a list of profiles with essential information for multiple users in a pipe (|) separated format. The Lambda will process each profile and complete three tasks:
Register the profile in a database.
Archive a file with the profile information in a S3 bucket.
Send a notification to the person via email.
What is Feral?
Feral is a framework for writing serverless functions in Scala with Cats Effect and deploying them to the cloud. It targets both JVM and JavaScript runtimes.
This framework supports the premise that JavaScript runtime is more convenient for serverless functions, as it doesn't require the longer startup times that JVM does. Also, Feral leverages the evolution of the Typelevel.js ecosystem, and libraries like Cats Effect and FS2 have versions for both JVM and JavaScript runtimes.
Usually, a Lambda function using Feral will have the following form: first, the definition of the input event and the return types: in our case, an S3Event and no return. Then, we load our Lambda’s configuration to be handled as a Cats Effect Resource.
Feral has definitions for different AWS event types. In our scenario, we will define a type for the event triggered by S3 after a new file is added. This event type looks something like this:
import io.circe.Decoder
finalcase class S3Event(records: List[S3EventRecord])object S3Event {
implicit val decoder: Decoder[S3Event] = Decoder.forProduct1("Records")(S3Event.apply)
}
finalcase class S3EventRecord(
eventVersion: String,
eventName: String,
s3: S3Message
)object S3EventRecord {
implicit val decoder: Decoder[S3EventRecord] = Decoder.forProduct3(
"eventVersion",
"eventName",
"s3" )(S3EventRecord.apply)
}
Implementing Our Lambda
Our profile processing Lambda will use a shared queue to store all new profiles waiting to be processed and load the profiles contained in the new S3 files into it. Then, it will start a group of working fibers (small independent processes handled by Cats Effect) which will be in charge of processing each profile. This will allow us to keep track of the active workers' countdown, and when no worker is active, the process will be marked as completed.
We assign each profile an ID during the parsing to identify it during the rest of the process. We will use a UUID for this.
def parseProfile[G[_] : Applicative](line: String): G[Option[Profile]] = {
   val result = line.split("\\|").map(_.trim).toList match {
      case firstName :: lastName :: email :: address :: phoneNumber :: age :: Nil =>
         val id = UUID.v4().toOption.getOrElse("")
         Some(Profile(id, firstName, lastName, email, address, phoneNumber, age.toInt))

      case _ => None
   }

   Applicative[G].pure(result)
}
We should highlight something here: Because we are using JavaScript runtime, we cannot use JVM’s UUID utilities. Instead, we will use the UUID npm package. To do that, we’ll need to import Scala.js, which will compile our Scala code into JavaScript for interoperability with JS libraries and allow us to create facades to communicate with these libraries using Scala code or, in our case, for using UUID:
Then, the workers will look for the next profile from the shared queue. If the queue is empty, the worker finalizes. Otherwise, the worker registers the profile in the database, archives it in the bucket, and sends the user an email notification before moving on to the next profile.
Each processing stage will have a similar structure to the following one. However, we will not use aws-js-sdk to create the facades; instead, we will use the aws-sdk-scalajs-facade library, which already provides the required facades. Also, the asynchronous API is generally preferred in cases like ours, so we use the putItemFuture function instead of the putItem one.
Creating Our Infrastructure on LocalStack with Terraform
Now, we can begin testing our Lambda locally. We will use LocalStack (a cloud service emulator that runs in a single container) and Terraform (an infrastructure-as-code tool) to create our required infrastructure locally.
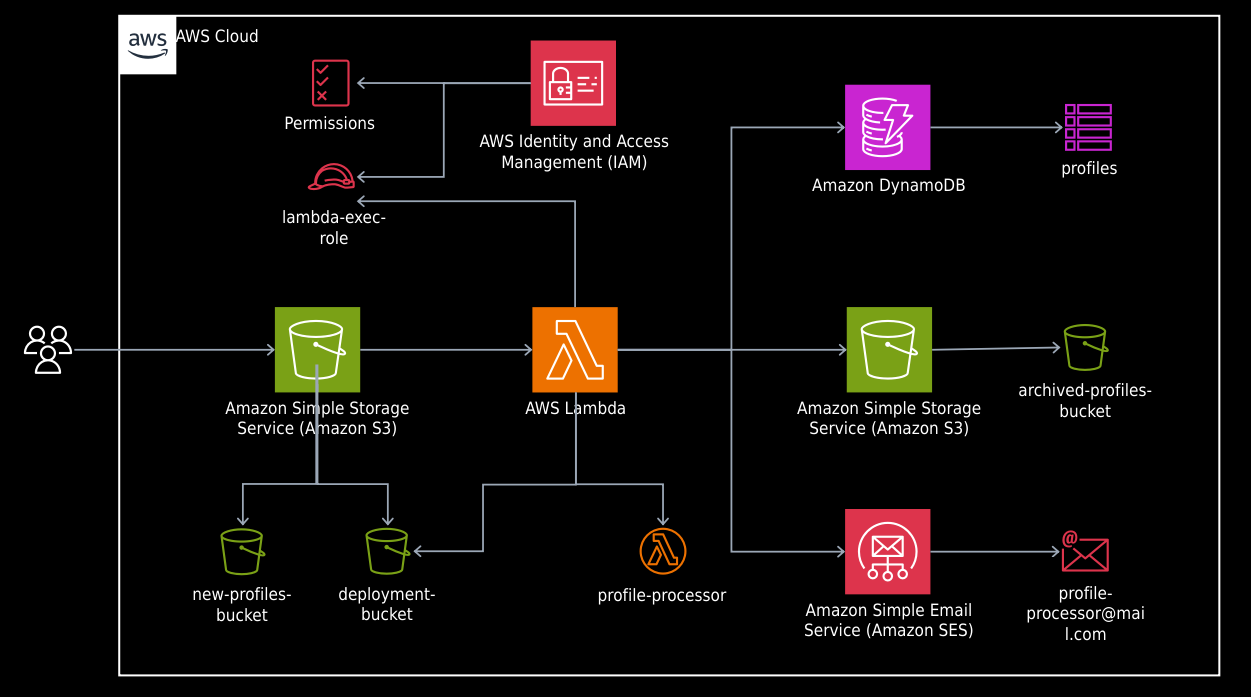
Our required infrastructure will consist of:
An IAM role for Lambda execution with policies to access DynamoDB, S3, and SES services.
A Lambda function called profile-processor.
S3 buckets: one for deploying the Lambda code, one for new profile files, and one for processed profile files.
A DynamoDB profiles table.
An email identity for sending email notifications.
While creating the infrastructure, you might have noticed that we have a dependency unavailable in LocalStack—the uuid-npm package. Because of this, we need to install the JavaScript dependencies before creating our Lambda function's zip so they can be contained within it.
An advantage of this approach is that we can specify the parametrization of our Lambda through Terraform variables, like the number of workers in this case.
After executing the Lambda in a LocalStack container in a machine with a file of 1000 profiles and 10 workers, we could verify in the container’s output that our Lambda started about one second after the file was added to the S3 bucket.
After reviewing the Lambda execution log, we can also confirm the process completion and that it lasted about 22 seconds.
2024-02-2117:43:11 [2024/02/21/[$LATEST]f88fd5c026adb16d502c9971330f78ae]
Process completed
2024-02-2117:43:11[2024/02/21/[$LATEST]f88fd5c026adb16d502c9971330f78ae]
END RequestId: ef8b0abc-ceed-4e44-9e62-e35fd3703134
2024-02-2117:43:11[2024/02/21/[$LATEST]f88fd5c026adb16d502c9971330f78ae]
REPORT RequestId: ef8b0abc-ceed-4e44-9e62-e35fd3703134 Duration: 22320.84 ms
Then, we can execute the same Lambda implementation, but this time for the JVM Runtime with the same 1000 profile files and the same 10 workers. Taking a look at the logs, we can verify that there is a longer delay before the Lambda starts to process events (about 10 seconds).
Finally, the Lambda execution log also confirms that the process reached completion and lasted about 30 seconds (a little bit more, too).
2024-02-2217:53:27[2024/02/22/[$LATEST]724c16bad9ad750d4a3766022dddbce6]
Process completed
2024-02-2217:53:27[2024/02/22/[$LATEST]724c16bad9ad750d4a3766022dddbce6]
END RequestId: d8f48a85-9fbe-4deb-a884-dd10e230f976
2024-02-2217:53:27[2024/02/22/[$LATEST]724c16bad9ad750d4a3766022dddbce6]
REPORT RequestId: d8f48a85-9fbe-4deb-a884-dd10e230f976 Duration: 30827.65 ms
Wrapping up
The Feral framework is great for creating AWS Lambdas that are unaffected by long startup times. It also lets us take advantage of Cats Effect and FS2 functionalities. The way it handles concurrency is also pretty elegant.
Although this approach could be a bit challenging at the beginning due to the switching between Scala and JavaScript worlds (facades, library availability), the benefits of Scala’s strong type system (catching errors in compilation, easier refactoring) and the benefits of effects systems in the JavaScript runtime definitely make up for it.
The complete code of these examples can be found on GitHub.
Bonus - Generating Test Data
We can create a test file of fake profiles using the following scala-cli script. Here we use java-faker for the generators of each profile field.
//> using scala "3.3.1"//> using dep "co.fs2::fs2-core::3.9.4"//> using dep "co.fs2::fs2-io::3.9.4"//> using dep "com.github.javafaker:javafaker:1.0.2"//> using dep "org.typelevel::cats-effect::3.5.3"import cats.effect._
import com.github.javafaker.Faker
import fs2._
import fs2.io.file.{Files, Path}
import java.util.Locale
case class Profile(firstName: String, lastName: String, email: String, address: String, phoneNumber: String, age: Int)object ProfilesGenerator extends IOApp.Simple:
val totalProfiles = 1000 val filePath = "generated-profiles.csv" def generateProfile: IO[Profile] =
val faker = new Faker(Locale.US)
val profile = Profile(
firstName = faker.name().firstName(),
lastName = faker.name().lastName(),
email = faker.internet().emailAddress(),
address = faker.address().fullAddress(),
phoneNumber = faker.phoneNumber().phoneNumber(),
age = faker.number().numberBetween(18, 100)
)
IO(profile)
def formatProfile(profile: Profile): IO[String] =
IO(s"${profile.firstName}|${profile.lastName}|${profile.email}|${profile.address}|${profile.phoneNumber}|${profile.age}\n")
def generateFile(x: Int): IO[Unit] =
Stream.range(0, x)
.evalMap(_ => generateProfile)
.evalMap(formatProfile)
.through(text.utf8.encode)
.through(Files[IO].writeAll(Path(filePath)))
.compile
.drain
def run = generateFile(totalProfiles) >> IO.println(s"File $filePath generated.")
Learn more
Frequently Asked Questions
What is Feral, and why use it for AWS Lambda functions?
Feral is a framework for building serverless functions in Scala using Cats Effect. It supports both JVM and JavaScript runtimes, but it’s especially useful for AWS Lambda because the JavaScript runtime avoids the slower cold starts common with JVM-based Lambdas. It also integrates well with Typelevel libraries like Cats Effect and FS2.
How does the profile processor Lambda work in this setup?
The Lambda is triggered whenever a new file is added to an S3 bucket. It processes a list of user profiles in the file by:
Registering each profile in a DynamoDB database
Archiving the profile data in a different S3 bucket
Sending a notification email to the user
Cats Effect fibers handle concurrent processing so multiple profiles can be processed efficiently without blocking other operations.
Why choose the JavaScript runtime instead of the JVM for this Lambda?
Using the JavaScript runtime results in significantly faster cold starts. In testing, the Lambda started processing within about one second on the JavaScript runtime, compared to roughly ten seconds on the JVM. This makes a noticeable difference for event-driven workloads where responsiveness matters.
How does LocalStack help in testing this Lambda?
LocalStack is used to emulate AWS services locally, allowing you to test the Lambda and its interactions without deploying to AWS. In this setup, LocalStack is combined with Terraform to provision everything needed, including S3 buckets, DynamoDB tables, IAM roles, and the Lambda itself. This setup makes development faster, cheaper, and easier to debug.
What challenges come with using Feral and Cats Effect for Lambdas?
Switching between Scala and JavaScript introduces some complexity, particularly when dealing with library compatibility and interop via Scala.js. For example, using UUIDs required pulling in a JavaScript library and creating Scala.js facades. However, the trade-off is worthwhile because Scala’s strong type system, Cats Effect’s concurrency tools, and FS2’s streaming capabilities provide a more robust and maintainable implementation.
AI is changing software development.
The Engineer's AI-Enabled Development Handbook is your guide to incorporating AI into development processes for smoother, faster, and smarter development.
Enjoyed the article? Get new content delivered to your inbox.
Subscribe below and stay updated with the latest developer guides and industry insights.
Thank you! Your submission has been received!
Oops! Something went wrong while submitting the form.
We use cookies to provide our services, to allow us to better understand our audience, and to provide and serve personalized ads or content. By using our website, you consent to the terms of our Privacy Policy and our Cookie Policy, and the use of cookies, pixels, and other technology as described more fully therein
.svg)